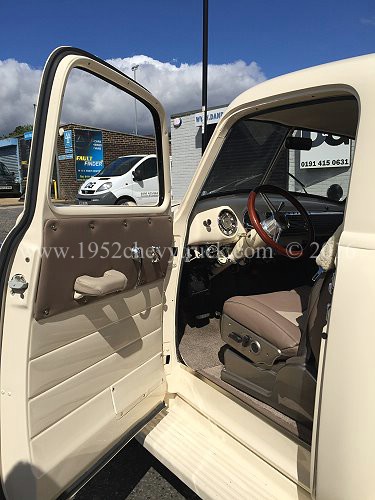
The doors on this truck have always been in good shape. There is no rust in them but they needed painting. In addition,
there has always been a plan to change the windows. From 1947-1950 the Chevy truck had a one-piece glass window. It
was found this type of window caused the inside of the cab to steam up with condensation. In 1951, the single piece
windows were replaced with smaller wind-up windows and corner vent windows. The vent windows could then be opened to


minimise condensation build up in the cab. Since this truck is fitted with air conditioning, condensation can be controlled.
Reverting back to the one-piece windows, in my opinion looks better. It is, however, not an easy conversion as no one
does a kit. (Or if they do I can't find it). The easy conversion is to fit 1947-1950 doors. This would result in the
earlier handles (which turn downwards, later handles are push button) being on the 52 truck. I have never, during this
project rejected a "better" solution just because it is difficult. (Check out the position of the fuel tank to illustrate
this point). I prefer the 52 truck to have the correct push button handles and so the more difficult conversion was
chosen - finding some earlier doors, stripping out the window rails then fitting them into the 1952 doors. If the doors
were to be restored and painted, this would be the ideal time to convert the windows. Early in 2014 I ordered 2 doors.
I had seen a complete truck on eBay which was being sold for spares but at the end of the auction it had not sold. I
contacted the owner and made him an offer just for the doors, including fittings and hinges. He accepted. I used a
courier to move the doors to my shipping agent in Pomona California. I also ordered new glass and rubber parts from
Jim Carter truck parts and they were also shipped to Pomona. Everything arrived in the UK in Dec. 2014 and were actually
delivered to my home on Christmas Eve. They have been stored in my garage since then and work started on the doors in
Feb. 2015. I had found an excellent media blasting company locally and they told me about another company just behind
them who did fabrication and painting. The owner's name was Robert and I called in to see him. It was a bit like walking
into "American Hotrod", the TV program. He was busy with a 1932 Ford for Custom Car Magazine. He had just painted a 65


Mustang body, there was a 58 Chevy truck receiving some much needed repairs to the metal work. New metal was being welded
in. He was expecting a Ford Escort Mexico. Looking upwards there was a 1927 Ford body on a shelf! Around the side walls


there were many large fabrication machines. Older types from the days machines were built to high standards. (Probably 1940s).
He had a proper paint booth to push a car into, all temperature controlled. It was all ideal. Robert had been in the


business for 40 years and I explained to him what I needed doing to the doors. He agreed to restore and alter the doors
and later paint the whole truck. The spare doors were taken to his workshop and he removed the internal channels in about
3 hours. It is worth mentioning hinges at this point. Original hinges are valuable. After-market hinges are unlikely to
fit correctly. Manufacturers in China are not very good at replicating this complex 3D design. I remember recently reading
an advert for a classic car which was being sold. The advert referred to the doors. "Recently fitted with new hinges
which need some more minor adjustments". Those who know, know exactly what this means. They will never fit properly and
the original hinges have been lost. No amount of adjustment will make them open and close correctly. It is possible to
buy new hinge pins from Jim Carter (and other companies) for the old original hinges if required. That it why, when I
purchased the doors I asked for the original hinges to be included. With the original hinges still on the original doors
I now also have a spare set of good original hinges on the spare doors. With all of those hinges and some new hinge pins
it should be possible to set up the doors perfectly. As of 28th March 2015 Robert has committed 23 hours to converting
the windows and he has not finished. Clearly if it is something you plan to do yourself, it will take time and if the
intention is to pay someone with good fabrication and problem solving skills, you will need a good budget to work
with. I have not actually been there during much of the work but from the notes below and the many pictures you
can hopefully work out what is involved. I can't find any other notes on the internet to show that anyone else
has taken on this challenge. I am sure others have, but maybe they did not record the process. I think it is all
worthwhile but I am sure many will not and will take the easier route of fitting the earlier doors to the later truck.
See below right the window mechanisms -
the earlier original one-piece window use an "X" scissor type (black) mechanism rather than the later (silver) hinged lever.
In the left hand picture below you can see the black metal trim (right hand side in picture) which goes round the outer edge
or the one piece window. Also see this edge round the window in the left hand picture at the top of this page. Not fitting
it would mean the glass would be loose in the channels and so it is necessary.
It has been decided to paint this edge cream to match the truck.


Holes are drilled through spot welds so that internal rails and supports can be removed.
One of the internal window rail supports was not in good shape and a new support has been fabricated.


Original hinges are shown below left. Drilled out spot welds are shown below left and above.


The earlier window channels are wider and so the metal trim needs to go round the one-piece window glass.


There was also the option of trying to put the later handles and locks on the earlier doors but that was assessed
to be an even greater challenge.


What you see in the pictures above is the result of 23 hours of work. The work continues .....
Many more details and pictures to follow soon. Watch this space.
New work.
There is a flat area at the bottom of the window in the 1952 door. This is the bottom fixing for the divider between the
vent window and the main window. This flattened area does not exist in the original door and so it needs cutting out. After
cutting it out a section of the earlier door must also be cut out and transferred to the 1952 door. This process
is shown in the following 7 pictures below. Both doors needed to be modified.


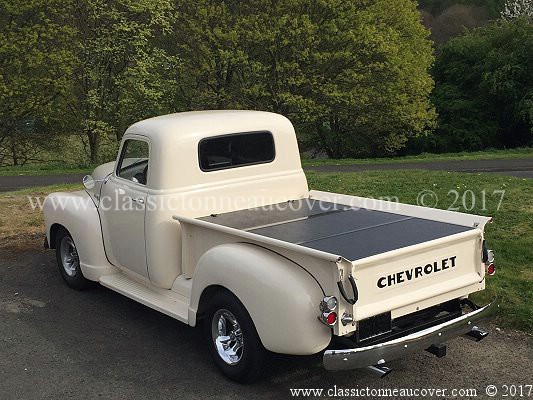
The two pictures below show the truck in May 2015 with the windows converted to single glass.


Update July 2017 Brush pile from "The Hairy Worm" ( www.thehairyworm.co.uk )
Use 10mm brush pile self adhesive tape on the inside and outside of the windows. It comes in 5m lengths.
Without it there is considerable vibration. When the window is down or partly down there is considerable shake
and even when fully up the window vibrates at the bottom. Brush pile holds the window firmly in all positions
and eliminates vibrations. It also eliminates draughts in that area of the window.


Update August 2017 The definitive guide to stopping your door handles from dropping off. More information.
The door panel. The door panel needs to be thin, 2mm ply is ideal and there needs to be a circle
of no sponge under the fabric where the handles fit on. If you can see a gap between the panel
and the handle, this means there is no pressure from the sponge trying to push the handle off.
"Loctite thread lock" on the grub screws.
"Gorilla" tape. Take a small slither of Gorilla double sided tape and put it in the slot on the
shaft where the grub will locate. Clean the slot with panel wipe or similar first and make sure
the thread lock only goes on the threads and not on the end of the grub screw. The Gorilla tape
will compress when the end of the grub screw is tightened against the shaft in the slot.
Drilling. If a spline is worn, drill a hole so that the grub screw goes partly into
the hole and use "thread lock" as well. One of my four splines (right hand window) was
worn and needed the shaft drilling.
Brush pile from the "The Hairy Worm" ( www.thehairyworm.co.uk ).
Without it there is considerable vibration. When the window is down or partly down there is
considerable shake and even when fully up the window vibrates at the bottom. Brush pile holds
the window (which is connected to the regulator and the rest of the door) firmly in all
positions and eliminates most of the vibrations which encourage the handles to drop
off in the first place.
If these measures are implementing the problem of handles dropping off should be eliminated.
See inside and outside below. The doors look great.


